[download id=”467″]
Olá galera do MundoJs
Vamos a mais um tutorial sobre javascript e games !
Desta vez algo um pouco mais avançado.
Se você está começando agora é melhor tentar antes esse tutorial e esse aqui também.
Este artigo mostra uma maneira de fazer um jogo de carrinho em javascript sem nenhuma imagem.
Para começar vamos desenhar o carrinho com HTML5 e Css:
<div style='position:relative; z-index:2; top:254px; left:254px; width:20px; height:40px; background-color:#000000; border-radius:4px;'>
  <div style='width:10px; height:4px; background-color:#000000; border:5px solid #ff4444; border-top:none; border-bottom:none;'></div>
  <div style='width:14px; height:20px; background-color:#999999; border:3px solid #000000;'></div>
</div>
Este carrinho ficará no meio da tela.
A pista irá se mover sob o carrinho.
Vamos desenhar a pista num <canvas>
<canvas id=canvas width=460 height=460 style='background-color:#ffffff; border:4px solid #497894; border-radius:10px;'></canvas>
<script>
  ctx = document.getElementById("canvas").getContext("2d");
  ctx.fillStyle = "#385383";
  ctx.fillRect(200, 200, 200, 200);
</script>
Vamos fazer esta pista se mover sob o carrinho com a função setTimeout atualizando a posição:
<div style='position:relative; z-index:2; top:254px; left:254px; width:20px; height:40px; background-color:#000000; border-radius:4px;'>
  <div style='width:10px; height:4px; background-color:#000000; border:5px solid #ff4444; border-top:none; border-bottom:none;'></div>
  <div style='width:14px; height:20px; background-color:#999999; border:3px solid #000000;'></div>
</div>
<canvas id=canvas width=460 height=460 style='background-color:#ffffff; border:4px solid #497894; border-radius:10px;'></canvas>
<script>
  ctx = document.getElementById("canvas").getContext("2d");
  x = 10;
  function move() {
    ctx.fillStyle = "#9aba9a";
    ctx.fillRect(0, 0, 460, 460);
    ctx.fillStyle = "#385383";
    x = x + 10;
    if (x > 300) x = -400;
    ctx.fillRect(200, 200 + x, 200, 200);
    setTimeout('move()', 100);
  }
  move();
</script>
O próximo passo é centralizar tudo usando a tag <center>
Depois disto interceptar o pressionamento das teclas com o atributo onKeydown
<!doctype html>
<html>
<title>Jogo de Corrida</title>

<body onKeyDown="vira(event.keyCode);" bgcolor=#e1e1e1>
  <br>
  <center>
    <div id=carro>
      <div style='position:relative; z-index:2; top:254px; width:20px; height:40px; background-color:#000000; border-radius:4px;'>
        <div style='width:10px; height:4px; background-color:#000000; border:5px solid #ff4444; border-top:none; border-bottom:none;'></div>
        <div style='width:14px; height:20px; background-color:#999999; border:3px solid #000000;'></div>
      </div>
    </div>
    <canvas id=canvas width=460 height=460 style='background-color:#ffffff; border:4px solid #497894; border-radius:10px;'></canvas>
  </center>
</body>
<script>
  ctx = document.getElementById("canvas").getContext("2d");
  x = 10;
  function move() {
    ctx.fillStyle = "#9aba9a";
    ctx.fillRect(0, 0, 460, 460);
    ctx.fillStyle = "#385383";
    x = x + 10;
    if (x > 300) x = -400;
    ctx.fillRect(200, 200 + x, 200, 200);
    setTimeout('move()', 100);
  }
  move();
  function vira(k) {
    alert(k);
  }
</script>
</html>
A função ‘vira()’ é executada quando o usuário pressiona qualquer tecla.
Com isso podemos descobrir o código das teclas direcionais.
O próximo passo é fazer o carro rotacionar com o comando <body onKeyDown>
<!doctype html>
<html>
<title>Jogo de Corrida</title>

<body onKeyDown="vira(event.keyCode);" bgcolor=#e1e1e1>
  <br>
  <center>
    <div id=carro>
      <div style='position:relative; z-index:2; top:254px; width:20px; height:40px; background-color:#000000; border-radius:4px; transform:rotate(180deg);'>
        <div style='width:10px; height:4px; background-color:#000000; border:5px solid #ff4444; border-top:none; border-bottom:none;'></div>
        <div style='width:14px; height:20px; background-color:#999999; border:3px solid #000000;'></div>
      </div>
    </div>
    <canvas id=canvas width=460 height=460 style='background-color:#ffffff; border:4px solid #497894; border-radius:10px;'></canvas>
  </center>
</body>
<script>
  ctx = document.getElementById("canvas").getContext("2d");
  x = 10;
  function move() {
    ctx.fillStyle = "#9aba9a";
    ctx.fillRect(0, 0, 460, 460);
    ctx.fillStyle = "#385383";
    x = x + 10;
    if (x > 300) x = -400;
    ctx.fillRect(200, 200 + x, 200, 200);
    setTimeout('move()', 100);
  }
  move();
  angulo = 18;
  function vira(k) {
    //alert(k);
    if (k == 37) angulo = (angulo + 35) % 36;
    if (k == 39) angulo = (angulo + 1) % 36;
    document.getElementById('carro').innerHTML = "<div style='position:relative; z-index:2; top:254px; width:20px; height:40px; background-color:#000000; border-radius:4px; transform:rotate(" + angulo + "0deg);'><div style='width:10px; height:4px; background-color:#000000; border:5px solid #ff4444; border-top:none; border-bottom:none;'></div><div style='width:14px; height:20px; background-color:#999999; border:3px solid #000000;'></div></div>";
  }
</script>
</html>
Repare que o angulo começa em 18.
O carro rotacionado 180 graus.
Apontado pra baixo.
’37’ e ’39’ são os códigos das teclas ‘esq’ e ‘dir’ do teclado.
Quando ‘esq’ é apertado o valor do angulo aumenta 35.
Como é sempre o resto da divisão por 36… nunca fica maior que 35.
Praticamente (angulo+35)%36 significa angulo-1.
Esse é o movimento básico do carrinho!
Mas tem uns detalhes a mais.
Enquanto o usuário manter a tecla pressionada o carro tem que ficar girando.
Isso complica um pouco porque o sistema operacional dá uma margem… um intervalo… um delay… quando user pressiona.
Para contornar essa situação vamos usar ‘onkeydown’ e ‘onkeyup’.
Mais duas variáveis ‘esq’ e ‘dir’.
E vamos colocar a atualização da variável angulo, e o desenho do carro, dentro da função ‘move()’
<!doctype html>
<html>
<title>Jogo de Corrida</title>

<body onKeyDown="vira(event.keyCode);" onKeyUp="para(event.keyCode);" bgcolor=#e1e1e1>
  <br>
  <center>
    <div id=carro></div>
    <canvas id=canvas width=460 height=460 style='background-color:#ffffff; border:4px solid #497894; border-radius:10px;'></canvas>
  </center>
</body>
<script>
  ctx = document.getElementById("canvas").getContext("2d");
  x = 10;
  angulo = 18;
  esq = false;
  dir = false;
  function vira(k) {
    if (k == 37) esq = true;
    if (k == 39) dir = true;
  }
  function para(k) {
    esq = false;
    dir = false;
  }
  function move() {
    if (esq) angulo = (angulo + 35) % 36;
    if (dir) angulo = (angulo + 1) % 36;
    document.getElementById('carro').innerHTML = "<div style='position:relative; z-index:2; top:254px; width:20px; height:40px; background-color:#000000; border-radius:4px; transform:rotate(" + angulo + "0deg);'><div style='width:10px; height:4px; background-color:#000000; border:5px solid #ff4444; border-top:none; border-bottom:none;'></div><div style='width:14px; height:20px; background-color:#999999; border:3px solid #000000;'></div></div>";
    ctx.fillStyle = "#9aba9a";
    ctx.fillRect(0, 0, 460, 460);
    ctx.fillStyle = "#385383";
    x = x - 10;
    if (x < -400) x = 460;
    ctx.fillRect(200, 200 + x, 200, 200);
    setTimeout('move()', 50);
  }
  move();
</script>
</html>
Agora começa a parte complicada!
Fazer o carro se mover em relação à pista.
Para isso vamos usar umas variáveis ‘fatorx’ e ‘fatory’.
Elas vão definir o deslocamento do carro em relação a pista… no eixo x e no eixo y.
Por exemplo… quando o carro estiver inclinado 30 graus ele irá se deslocar 6 pixels no eixo x e -3 pixels no eixo y…
fatorx=[9,8,7,6,5,4,3,2,1,0,-1,-2,-3,-4,-5,-6,-7,-8,-9,-8,-7,-6,-5,-4,-3,-2,-1,0,1,2,3,4,5,6,7,8];
fatory=[0,-1,-2,-3,-4,-5,-6,-7,-8,-9,-8,-7,-6,-5,-4,-3,-2,-1,0,1,2,3,4,5,6,7,8,9,8,7,6,5,4,3,2,1];
<!doctype html>
<html>
<title>Jogo de Corrida</title>

<body onKeyDown="vira(event.keyCode);" onKeyUp="para(event.keyCode);" bgcolor=#e1e1e1>
  <br>
  <center>
    <div id=carro></div>
    <canvas id=canvas width=460 height=460 style='background-color:#ffffff; border:4px solid #497894; border-radius:10px;'></canvas>
  </center>
</body>
<script>
  ctx = document.getElementById("canvas").getContext("2d");
  fatorx = [9, 8, 7, 6, 5, 4, 3, 2, 1, 0, -1, -2, -3, -4, -5, -6, -7, -8, -9, -8, -7, -6, -5, -4, -3, -2, -1, 0, 1, 2, 3, 4, 5, 6, 7, 8];
  fatory = [0, -1, -2, -3, -4, -5, -6, -7, -8, -9, -8, -7, -6, -5, -4, -3, -2, -1, 0, 1, 2, 3, 4, 5, 6, 7, 8, 9, 8, 7, 6, 5, 4, 3, 2, 1];
  px = 10;
  py = 10;
  angulo = 18;
  esq = false;
  dir = false;
  function vira(k) {
    if (k == 37) esq = true;
    if (k == 39) dir = true;
  }
  function para(k) {
    esq = false;
    dir = false;
  }
  function move() {
    if (esq) angulo = (angulo + 35) % 36;
    if (dir) angulo = (angulo + 1) % 36;
    document.getElementById('carro').innerHTML = "<div style='position:relative; z-index:2; top:254px; width:20px; height:40px; background-color:#000000; border-radius:4px; transform:rotate(" + angulo + "0deg);'><div style='width:10px; height:4px; background-color:#000000; border:5px solid #ff4444; border-top:none; border-bottom:none;'></div><div style='width:14px; height:20px; background-color:#999999; border:3px solid #000000;'></div></div>";
    ctx.fillStyle = "#9aba9a";
    ctx.fillRect(0, 0, 460, 460);

    px += fatorx[angulo] * 3.7;
    py += fatory[angulo] * 3.7;

    ctx.fillStyle = "#385383";
    ctx.fillRect((200) + py + 38, (200) + px + 28, 200, 200);

    setTimeout('move()', 75);
  }
  move();
</script>
</html>
Agora já temos um carro completamente dirigível !!!
Uhu!!!
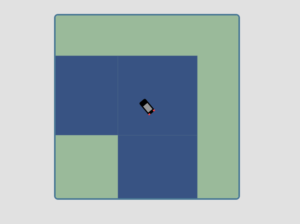
Agora vamos à pista.
Vamos criar um ‘array de arrays’ com zeros representando grama e um representando asfalto.
<!doctype html>
<html>
<title>Jogo de Corrida</title>

<body onKeyDown="vira(event.keyCode);" onKeyUp="para(event.keyCode);" bgcolor=#e1e1e1>
  <br>
  <center>
    <div id=carro></div>
    <canvas id=canvas width=460 height=460 style='background-color:#ffffff; border:4px solid #497894; border-radius:10px;'></canvas>
  </center>
</body>
<script>
  ctx = document.getElementById("canvas").getContext("2d");
  fatorx = [9, 8, 7, 6, 5, 4, 3, 2, 1, 0, -1, -2, -3, -4, -5, -6, -7, -8, -9, -8, -7, -6, -5, -4, -3, -2, -1, 0, 1, 2, 3, 4, 5, 6, 7, 8];
  fatory = [0, -1, -2, -3, -4, -5, -6, -7, -8, -9, -8, -7, -6, -5, -4, -3, -2, -1, 0, 1, 2, 3, 4, 5, 6, 7, 8, 9, 8, 7, 6, 5, 4, 3, 2, 1];
  pista = [
    [1, 1, 1, 1, 1, 1, 1, 1, 1, 1, 1, 1],
    [1, 0, 0, 0, 0, 0, 0, 0, 0, 0, 0, 1],
    [1, 0, 0, 0, 1, 1, 1, 1, 0, 0, 0, 1],
    [1, 0, 0, 0, 1, 0, 0, 1, 0, 0, 0, 1],
    [1, 0, 0, 0, 1, 0, 0, 1, 0, 0, 0, 1],
    [1, 0, 0, 0, 1, 0, 0, 1, 0, 0, 0, 1],
    [1, 0, 0, 0, 1, 0, 0, 1, 0, 0, 0, 1],
    [1, 1, 1, 1, 1, 0, 0, 1, 1, 1, 1, 1],
  ];
  px = 10;
  py = 10;
  angulo = 18;
  esq = false;
  dir = false;
  function vira(k) {
    if (k == 37) esq = true;
    if (k == 39) dir = true;
  }
  function para(k) {
    esq = false;
    dir = false;
  }
  function move() {
    if (esq) angulo = (angulo + 35) % 36;
    if (dir) angulo = (angulo + 1) % 36;
    document.getElementById('carro').innerHTML = "<div style='position:relative; z-index:2; top:254px; width:20px; height:40px; background-color:#000000; border-radius:4px; transform:rotate(" + angulo + "0deg);'><div style='width:10px; height:4px; background-color:#000000; border:5px solid #ff4444; border-top:none; border-bottom:none;'></div><div style='width:14px; height:20px; background-color:#999999; border:3px solid #000000;'></div></div>";
    ctx.fillStyle = "#9aba9a";
    ctx.fillRect(0, 0, 460, 460);
    px += fatorx[angulo] * 3.7;
    py += fatory[angulo] * 3.7;
    ctx.fillStyle = "#385383";
    for (x = 0; x < pista.length; x++)for (y = 0; y < pista[x].length; y++)if (pista[x][y] != 0) ctx.fillRect((200 * y) + py + 38, (200 * x) + px + 28, 200, 200);
    setTimeout('move()', 75);
  }
  move();
</script>
</html>
A linha 48 desenha a pista inteira com os ‘for’ e os parâmetros em ‘fillrect’…
Um próximo passo pode ser fazer o carro diminuir a velocidade quando está sobre a grama!
Fazer outras fases…
Fazer a velocidade ir aumentado.
Usar imagens para o carro. Imagens para a pista. pngs transparentes.
‘O céu é o limite.’
Dá para melhorar bem.
Essa é só uma simples versão de 53 linhas